Fix your technical setup to skip the spam folder
SPF setup
Step 1: Sign in to your domain provider
Step 2: Navigate to the page to edit your domain’s DNS records
It can sometimes be called “DNS Management”, “Name Server Management”, or “Advanced Settings”.
Step 3: Check your current setup
Check that you don’t already have an SPF setup. An SPF record looks like this:


Step 4 (if you have 2 or more tools that require SPF):
Add an SPF record for 2 tools. It should look like this:

Copy-paste the following text and replace “[tool-domain]” by the tool’s domain url:

Step 4 (if you have 1 tool that require SPF):
Add an SPF record for 1 tools. It should look like this:

Copy-paste the following text:
Step 5: Check that your new setup works
Go to the “Deliverability checker” tool in lemstack to test your domain.
DKIM setup
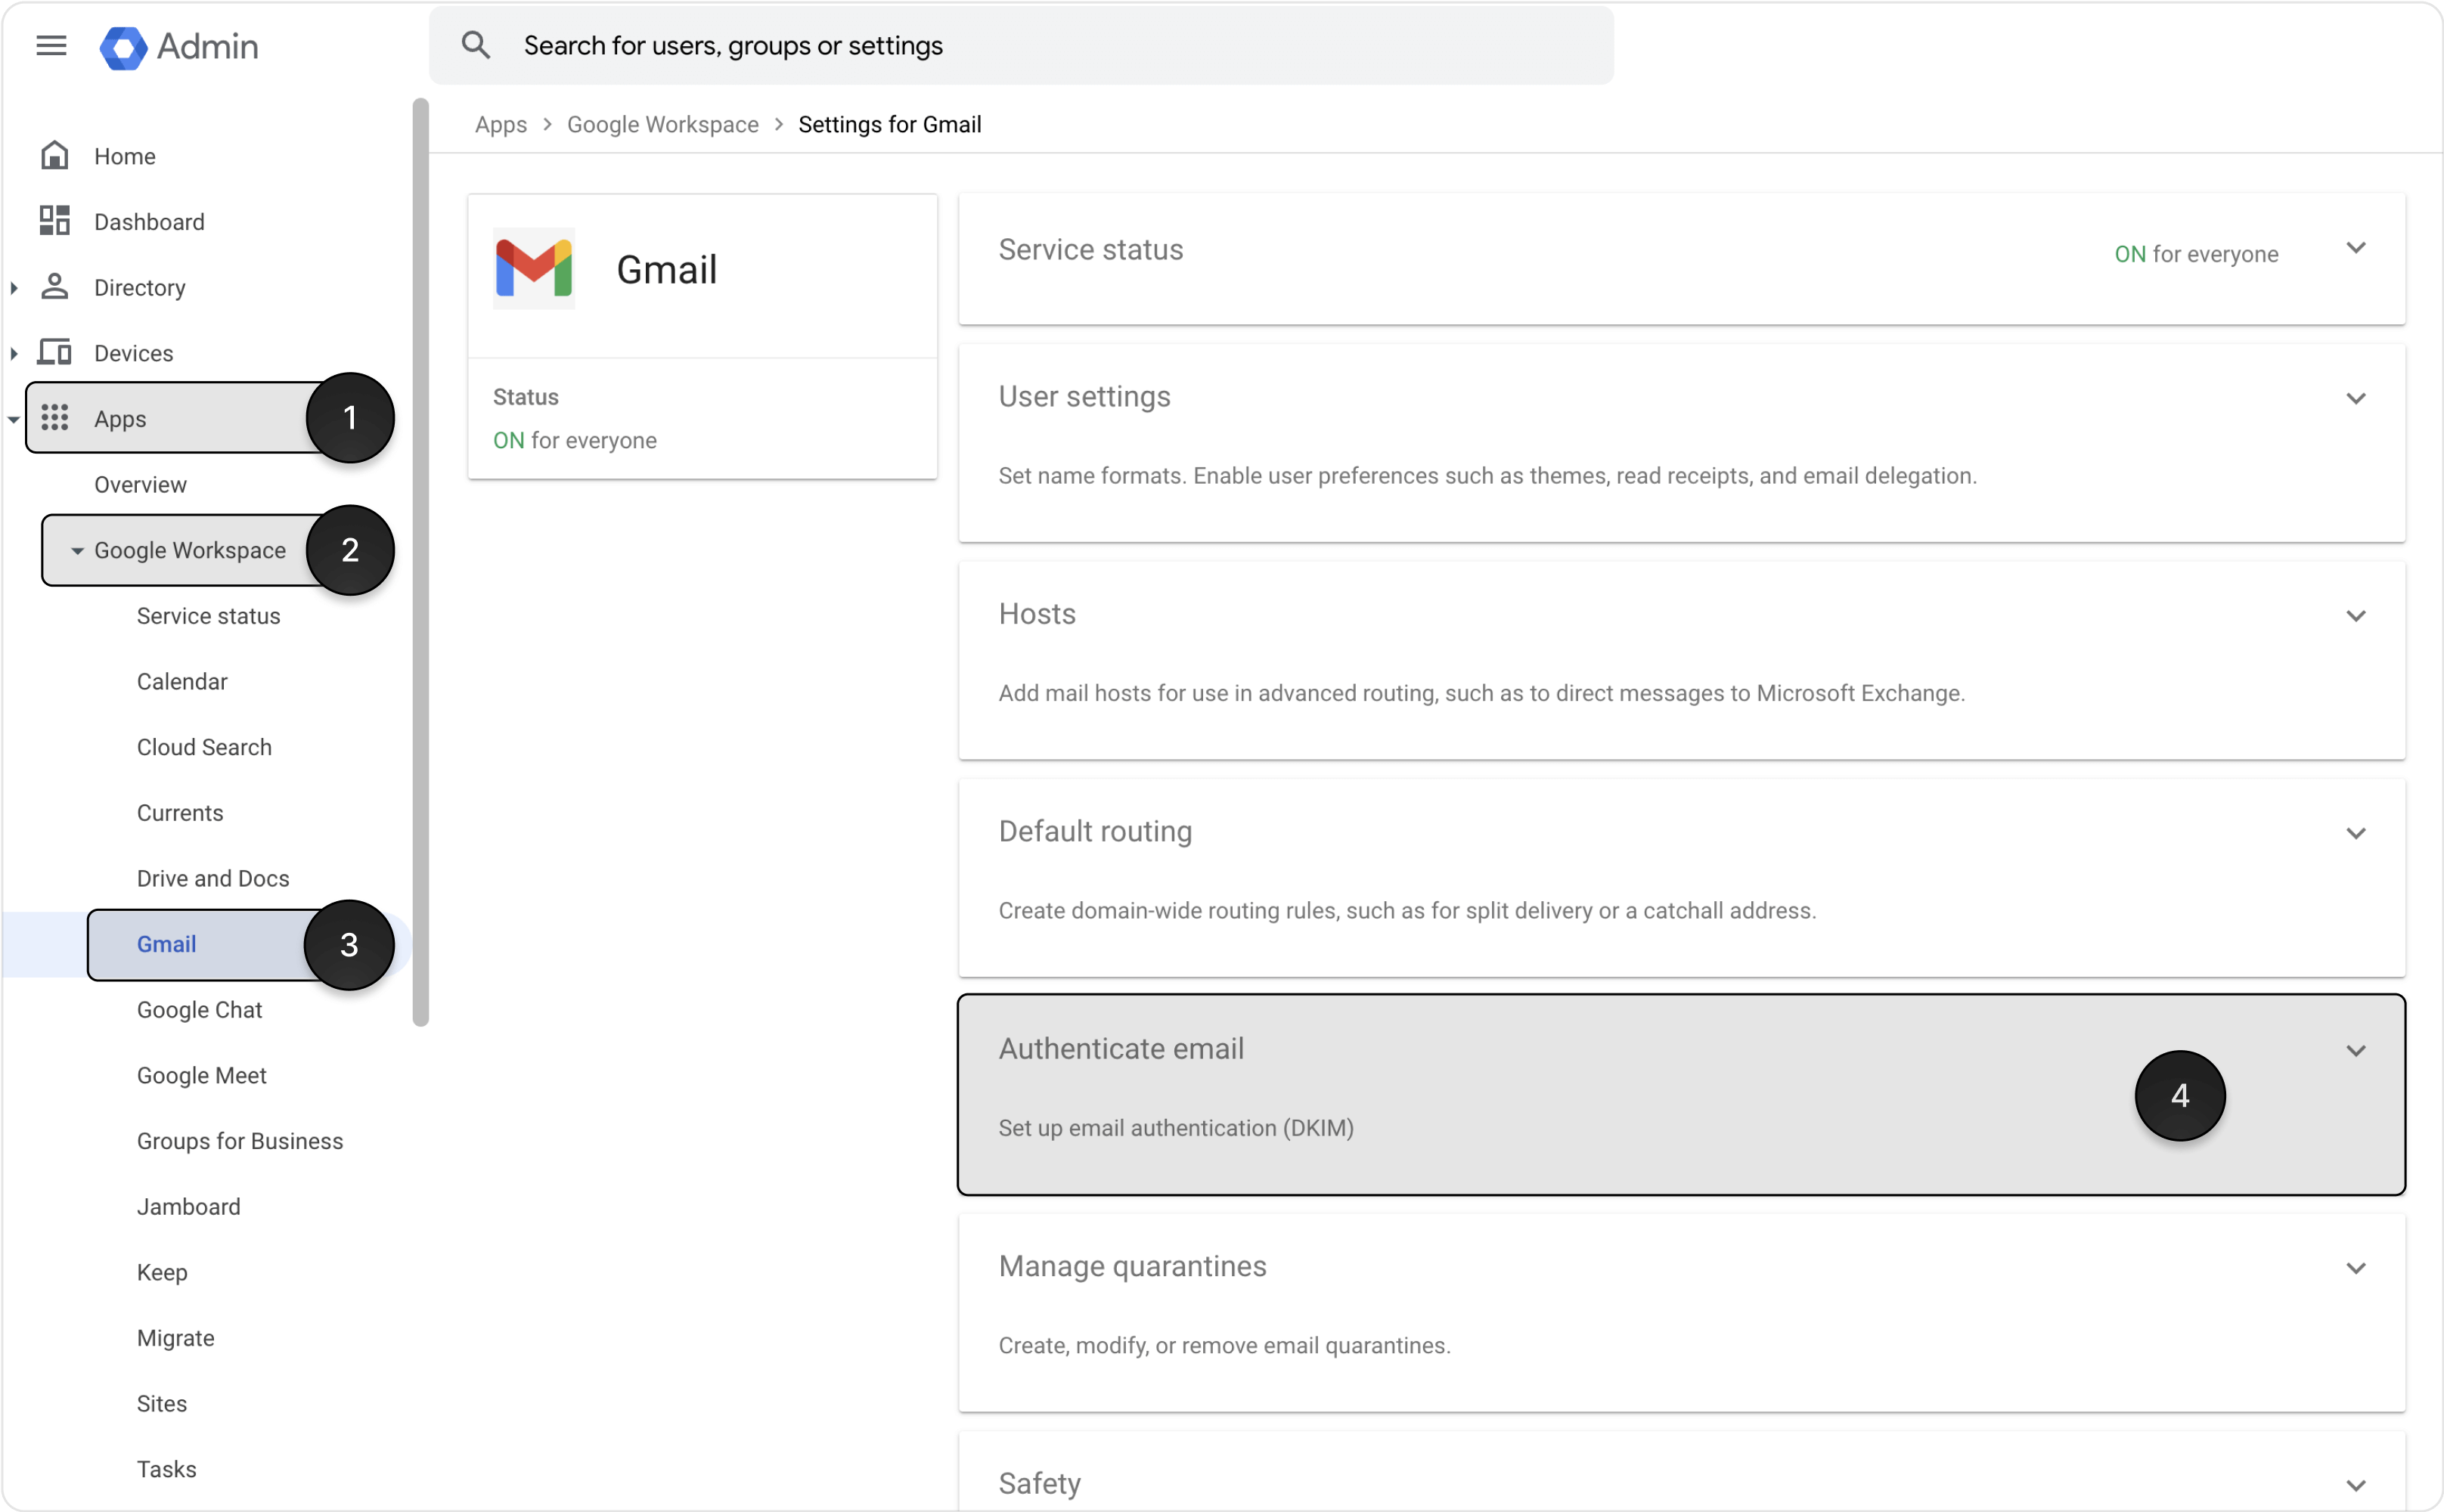
Step 1: Sign in to the Google Admin console
Step 2: Navigate to the “Authenticate email” section
Step 3: Sign in to your domain provider
Step 4: Navigate to the page to edit your domain’s DNS records
It can sometimes be called “DNS Management”, “Name Server Management”, or “Advanced Settings”.
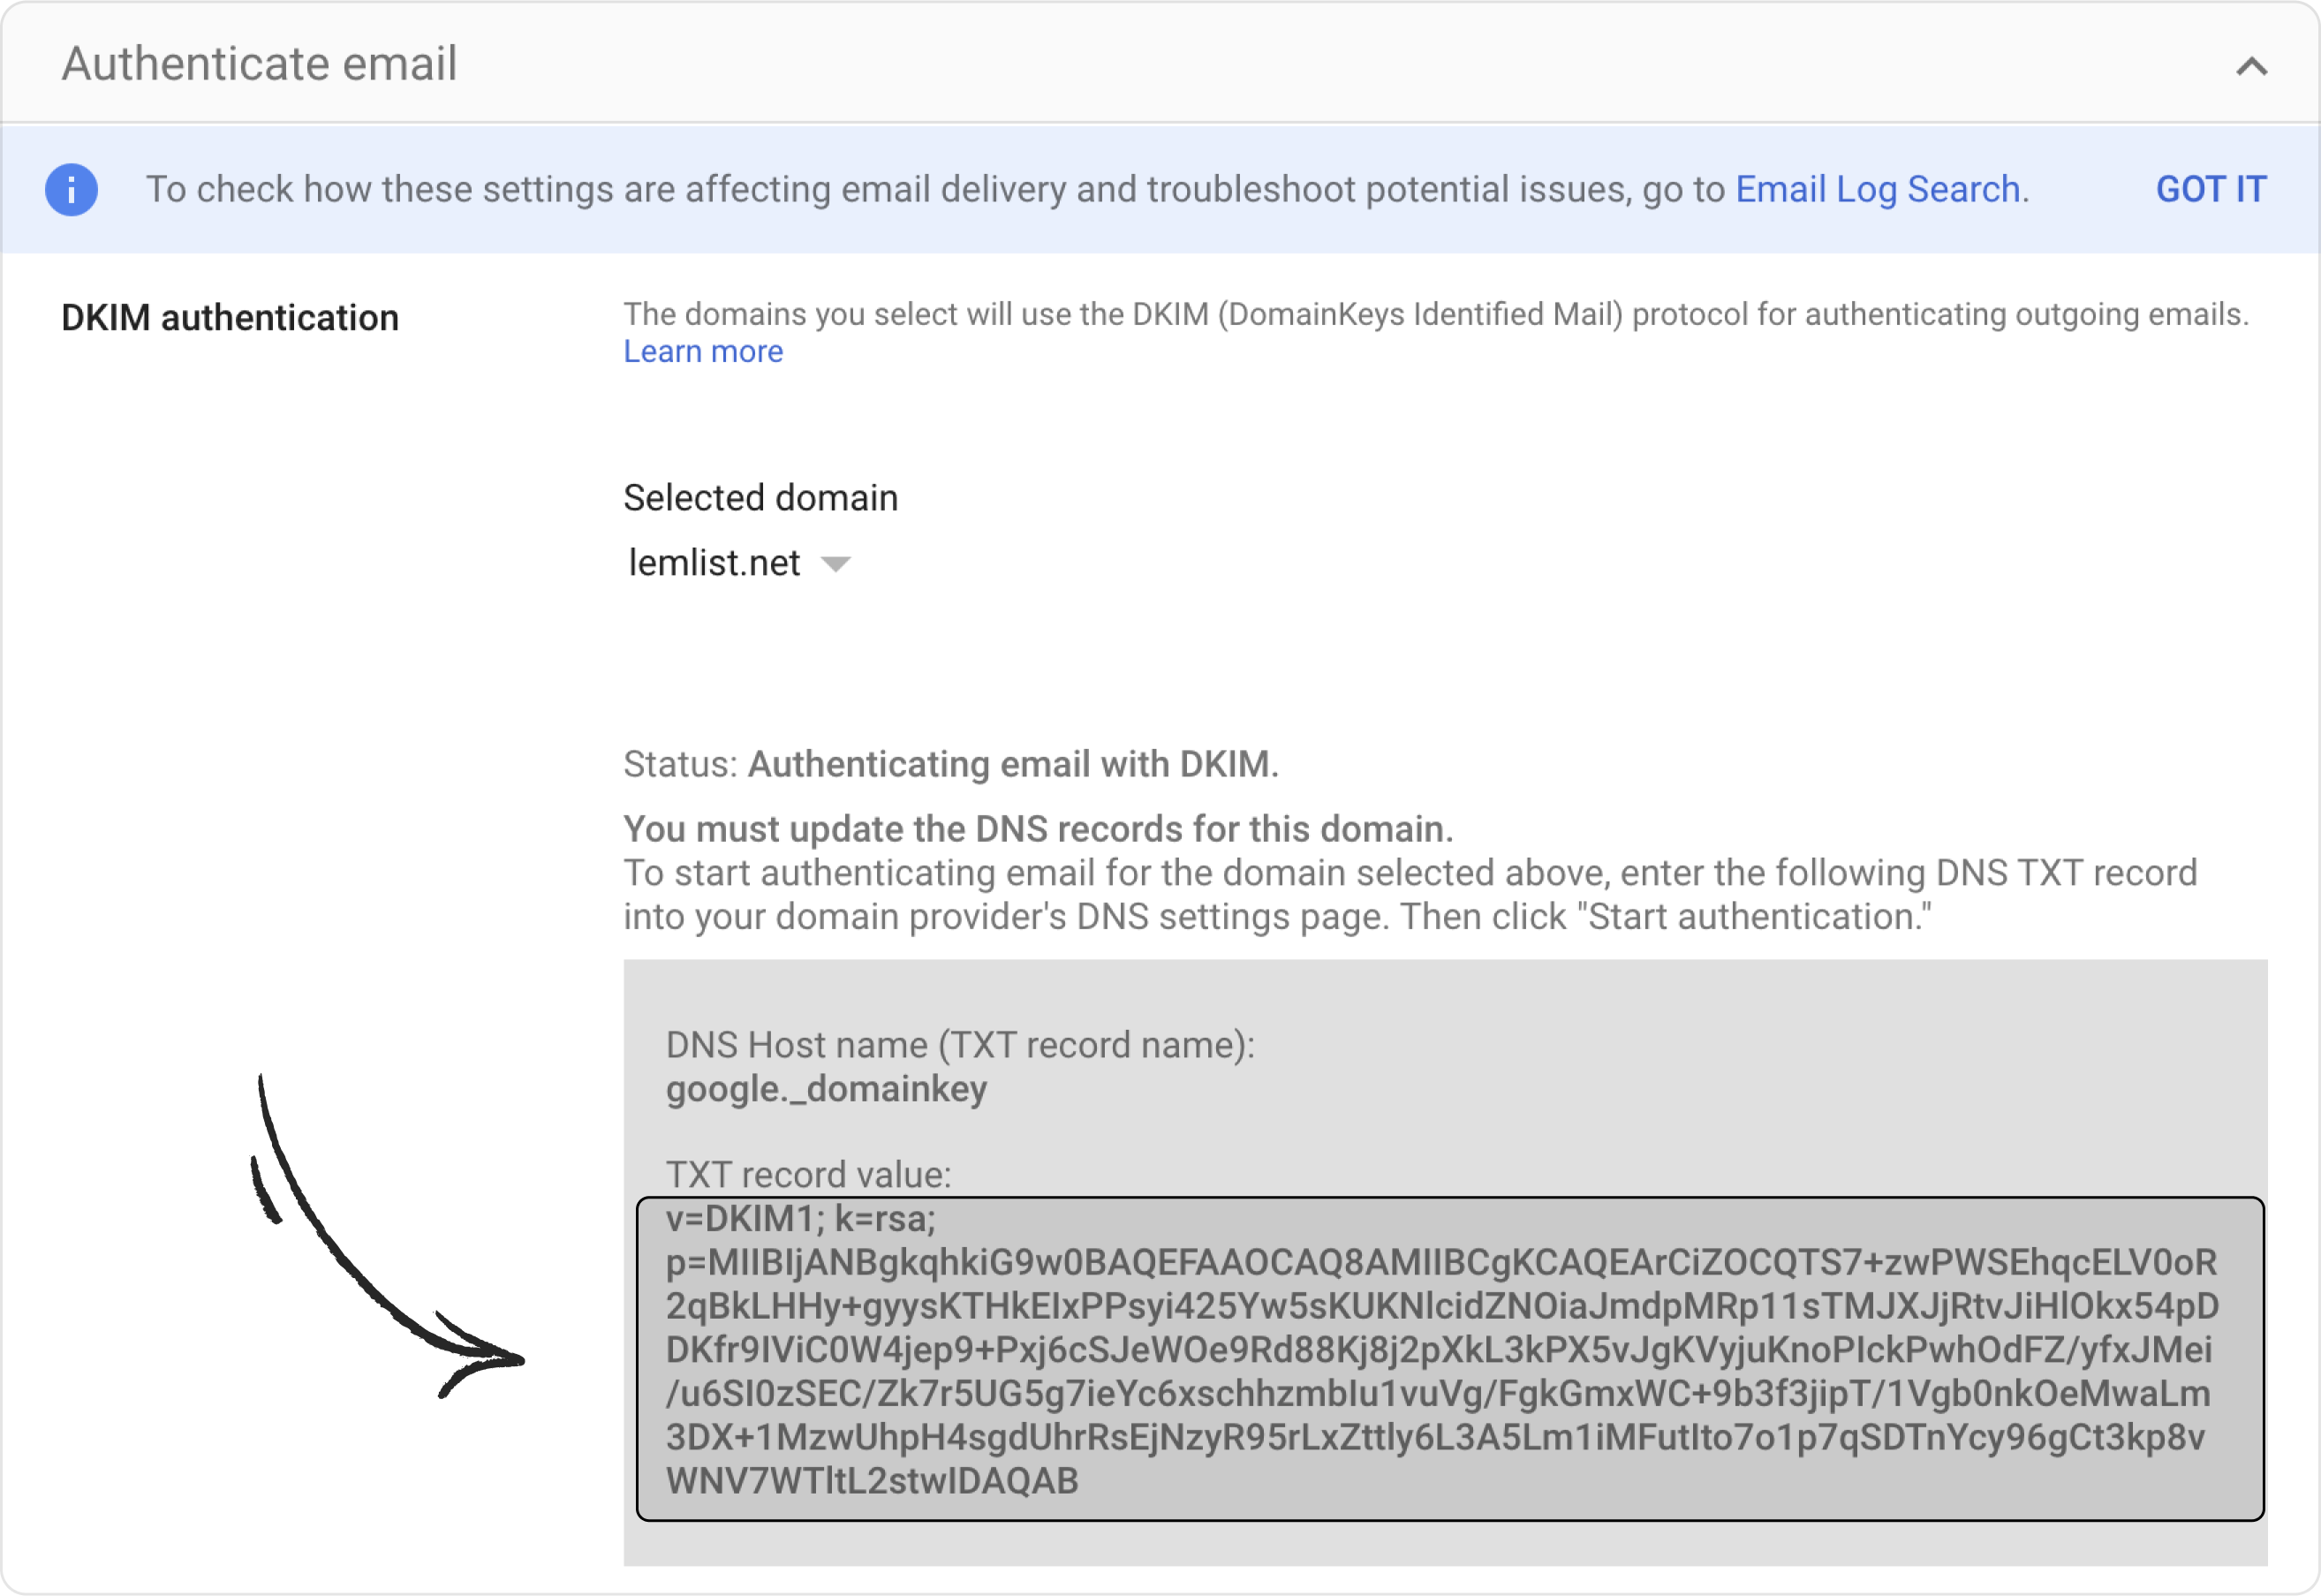
Step 5: Add your DKIM to your DNS records
It should look like this:

Copy-paste the following text:
Step 4: Check that your new setup works
Go to the “Deliverability checker” tool in lemstack to test your domain.
MX records setup
Step 1: Sign in to your domain provider
Step 2: Navigate to the page to edit your domain’s DNS records
It can sometimes be called “DNS Management”, “Name Server Management”, or “Advanced Settings”.
Step 3: Delete any existing MX records
They will look something like this:

Step 4: Add the following MX records
Copy-paste the following text:
Step 5: Check that your new setup works
Go to the “Deliverability checker” tool in lemstack to test your domain.
DMARC setup
Step 1: Sign in to your domain provider
Step 2: Navigate to the page to edit your domain’s DNS records
It can sometimes be called “DNS Management”, “Name Server Management”, or “Advanced Settings”.
Step 3: Add your DMARC to your DNS records
They will look something like this:

Step 5: Check that your new setup works
Go to the “Deliverability checker” tool in lemstack to test your domain.
SPF setup
Step 1: Sign in to your domain provider
Step 2: Navigate to the page to edit your domain’s DNS records
It can sometimes be called “DNS Management”, “Name Server Management”, or “Advanced Settings”.
Step 3: Check your current setup
Check that you don’t already have an SPF setup. An SPF record looks like this:
Step 4 (if you have 2 or more tools that require SPF):
Add an SPF record for 2 tools. It should look like this:
.png)
Copy-paste the following text and replace “[tool-domain]” by the tool’s domain url:
Step 4 (if you have 1 tool that require SPF):
Add an SPF record for 1 tools. It should look like this:

Copy-paste the following text:
Step 5: Check that your new setup works
Go to the “Deliverability checker” tool in lemstack to test your domain.
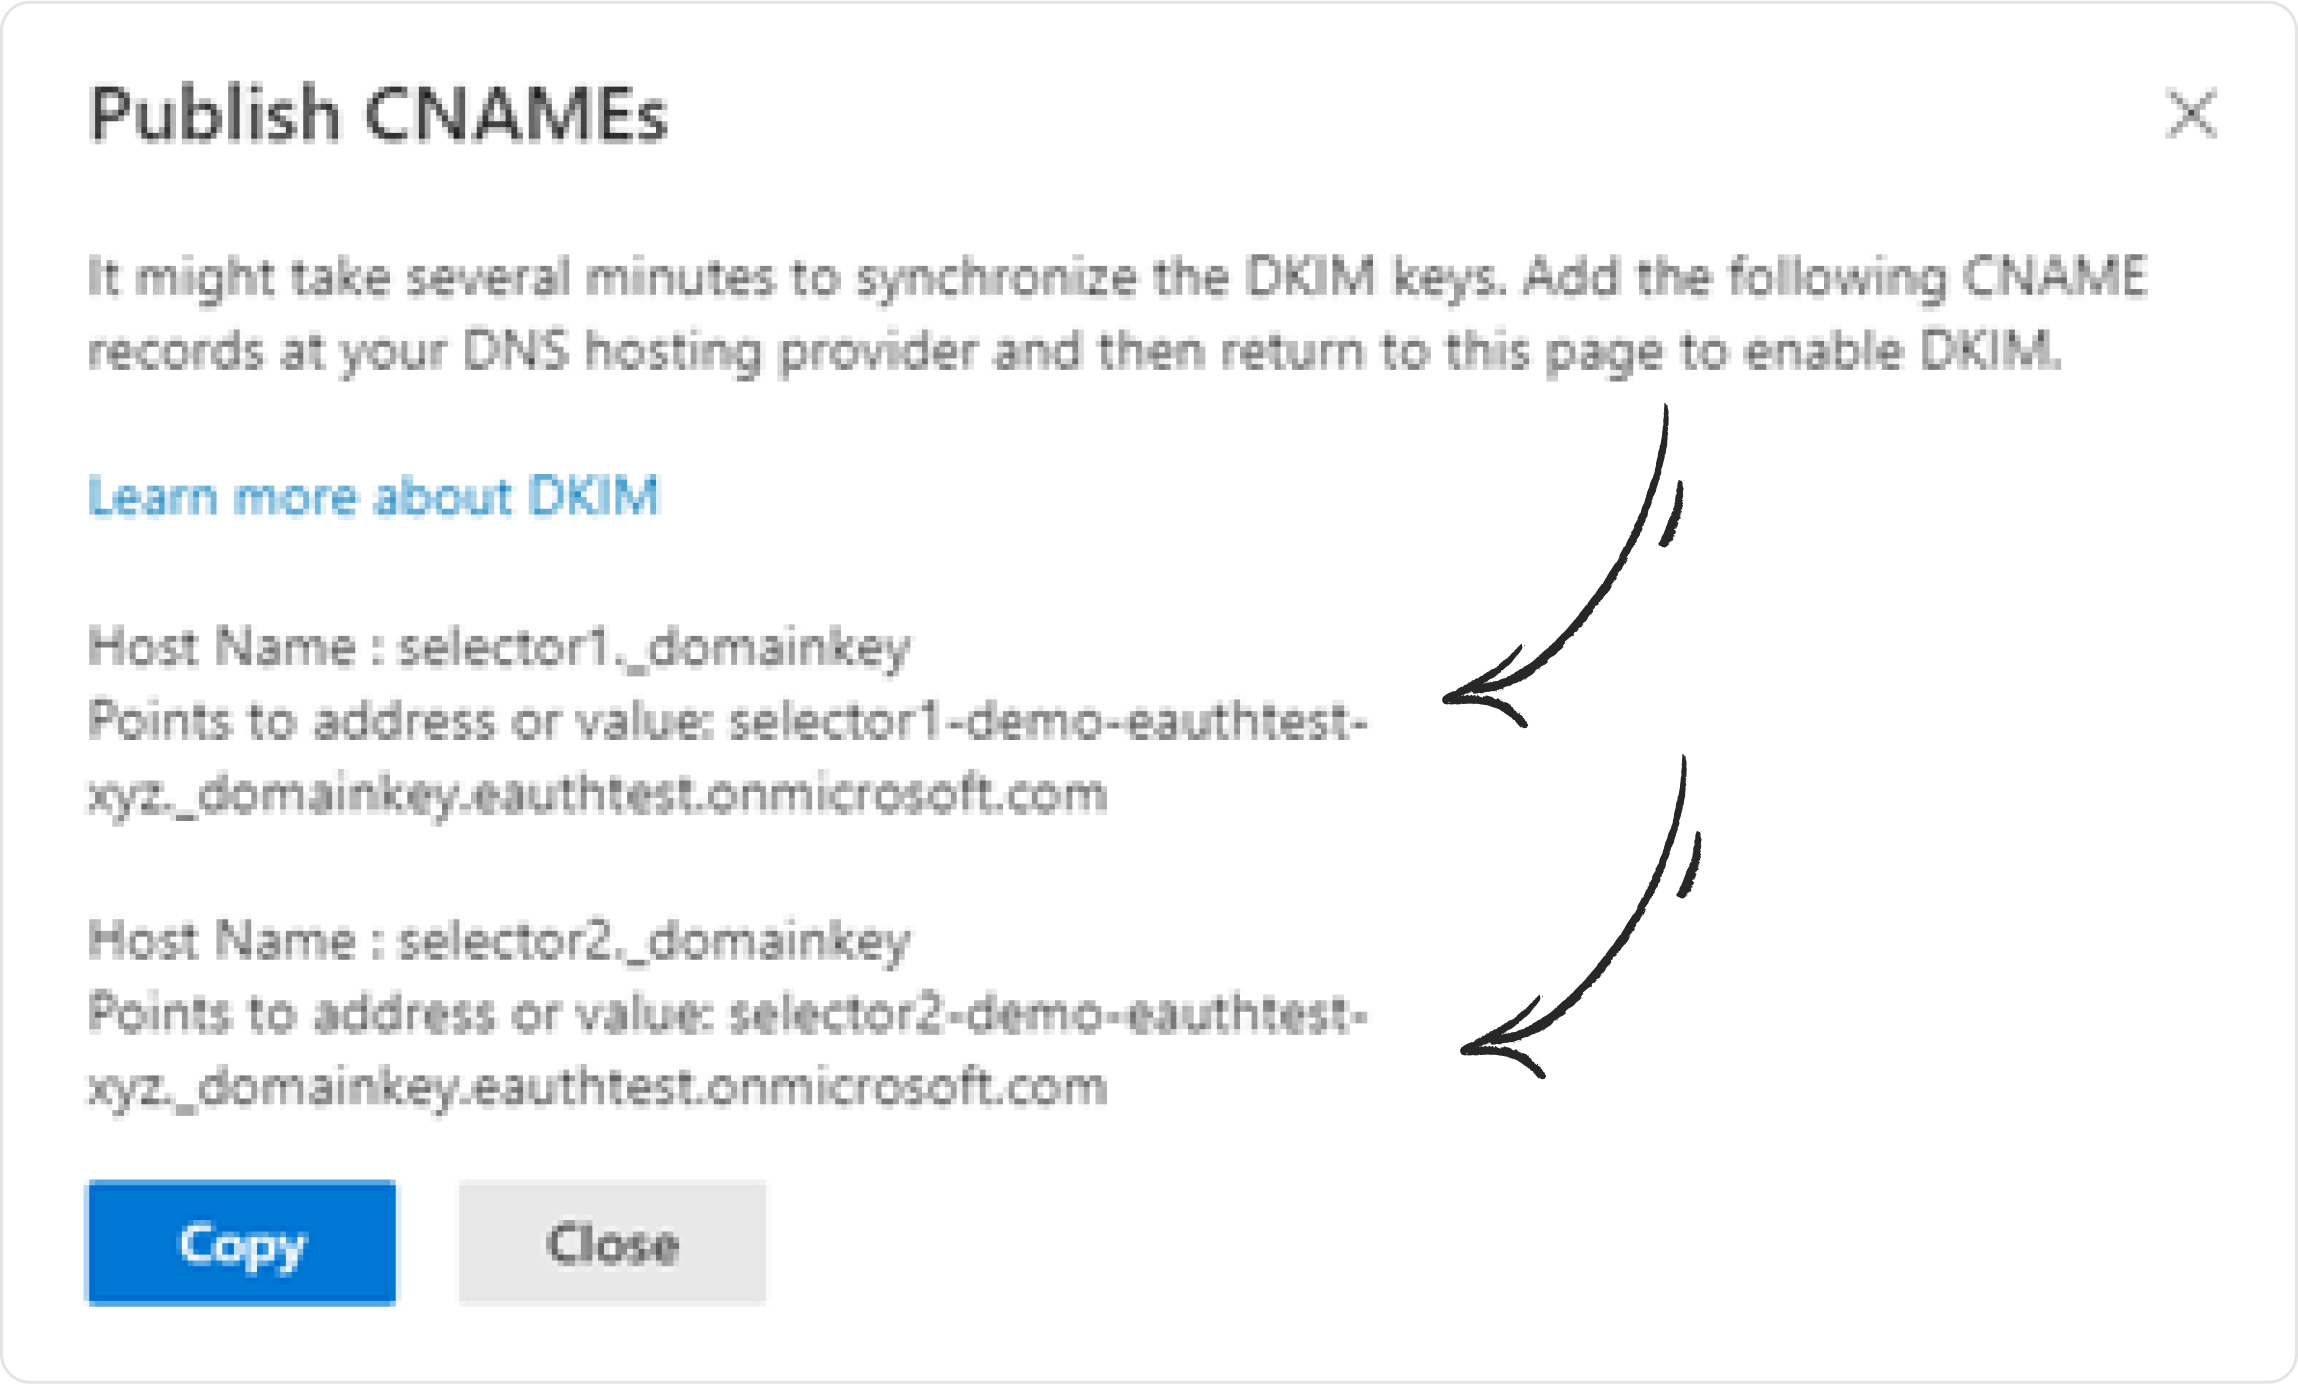
DKIM setup
Step 1: Sign in to the Microsoft 365 admin center
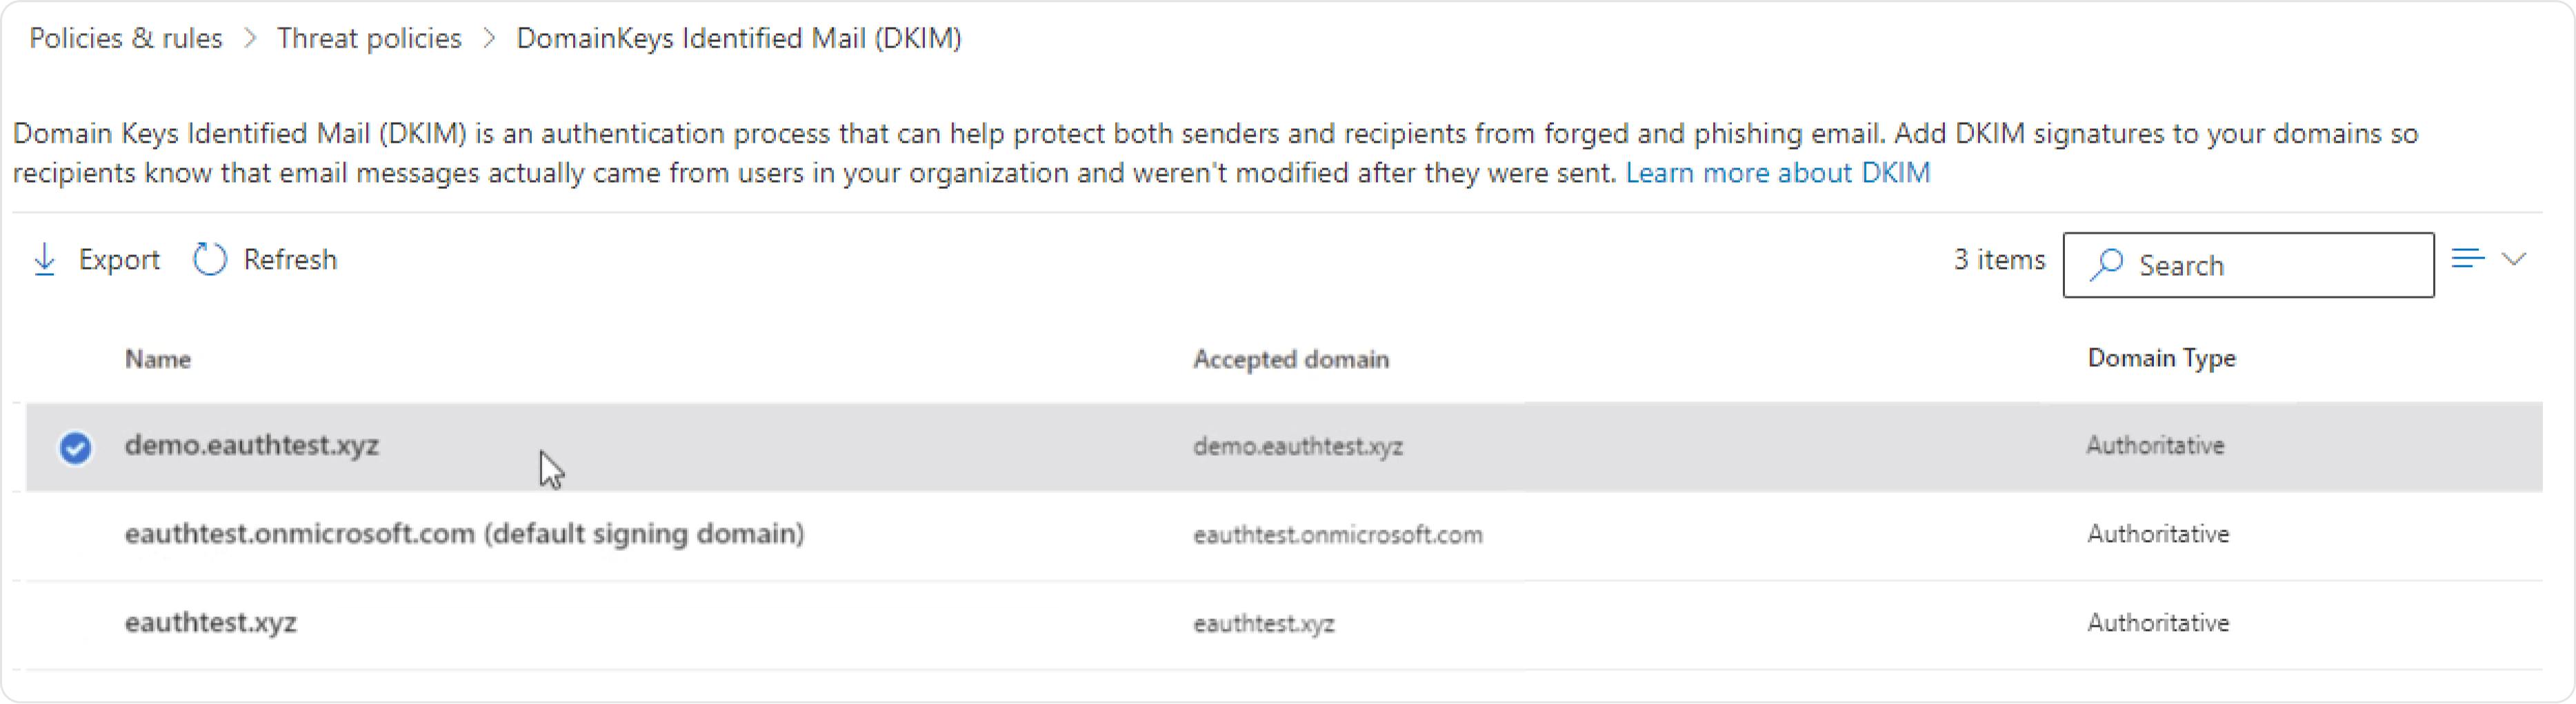
Step 2: Then go the DKIM page, and select your domain
Step 3: Click on “Create DKIM keys”
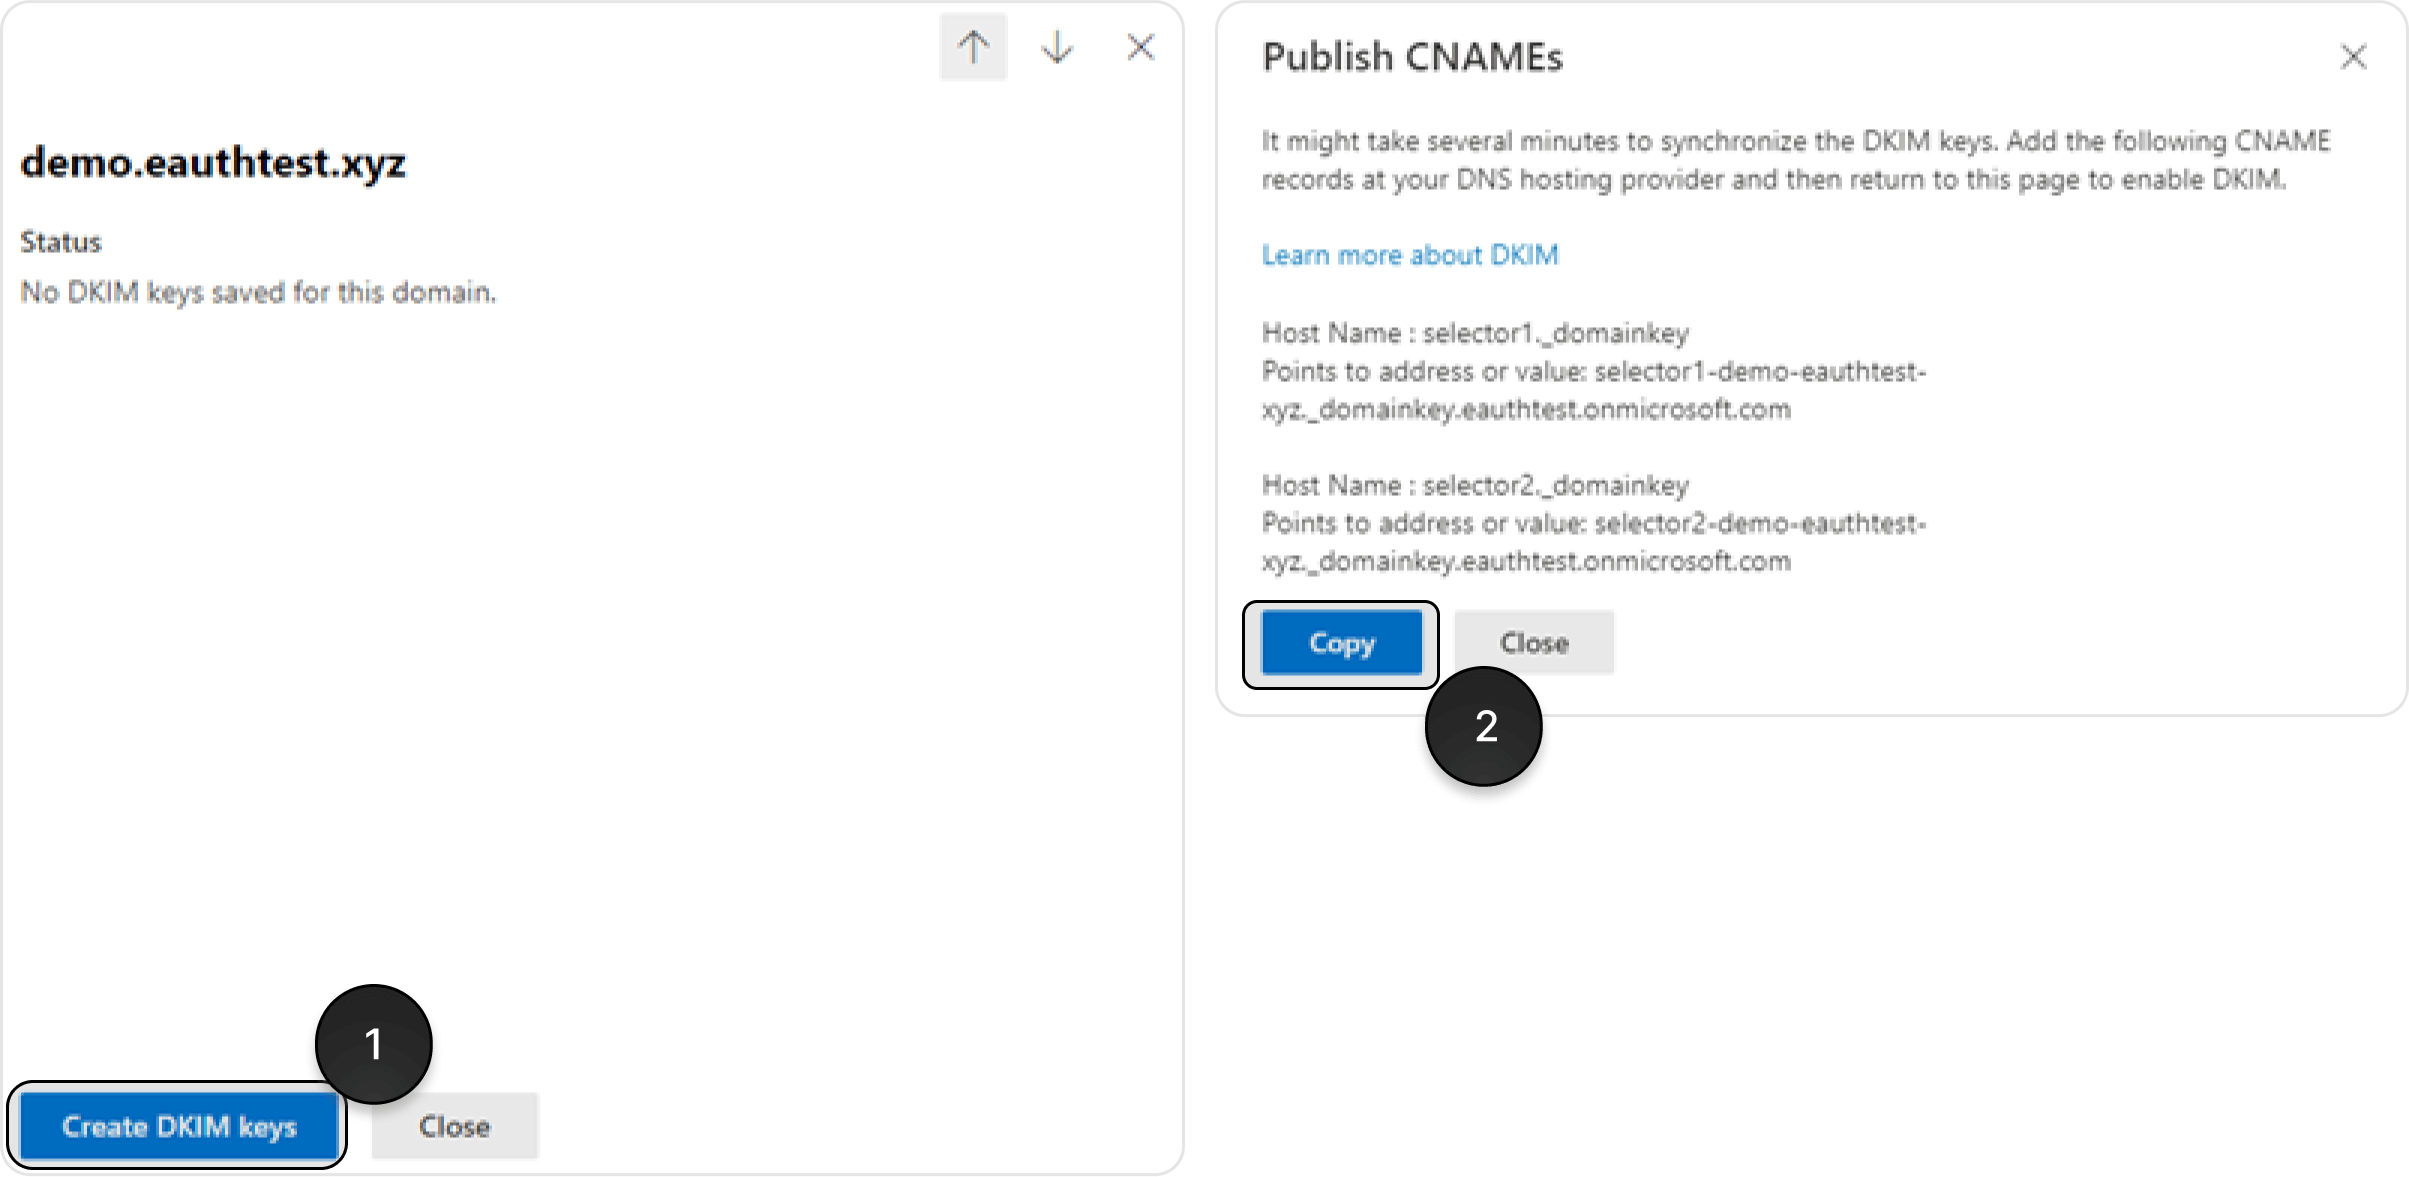
Step 3: Click on “Create DKIM keys”
Step 4: Sign in to your domain provider
Step 5: Navigate to the page to edit your domain’s DNS records
It can sometimes be called “DNS Management”, “Name Server Management”, or “Advanced Settings”.
Step 6: Add your DKIM to your DNS records
It should look like this:

Copy-paste the following text:
Step 7: Check that your new setup works
Go to the “Deliverability checker” tool in lemstack to test your domain.
MX records setup
Step 1: Sign in to your domain provider
Step 2: Navigate to the page to edit your domain’s DNS records
It can sometimes be called “DNS Management”, “Name Server Management”, or “Advanced Settings”.
Step 3: Delete any existing MX records
They will look something like this:
Step 4: Add the following MX records
Copy-paste the following text:
Step 5: Check that your new setup works
Go to the “Deliverability checker” tool in lemstack to test your domain.
DMARC setup
Step 1: Sign in to your domain provider
Step 2: Navigate to the page to edit your domain’s DNS records
It can sometimes be called “DNS Management”, “Name Server Management”, or “Advanced Settings”.
Step 3: Add your DMARC to your DNS records
They will look something like this:
Step 5: Check that your new setup works
Go to the “Deliverability checker” tool in lemstack to test your domain.
SPF setup
Step 1: Sign in to your domain provider
Step 2: Navigate to the page to edit your domain’s DNS records
It can sometimes be called “DNS Management”, “Name Server Management”, or “Advanced Settings”.
Step 3: Check your current setup
Check that you don’t already have an SPF setup. An SPF record looks like this:
Step 4 (if you have 2 or more tools that require SPF):
Add an SPF record for 2 tools. It should look like this:

Copy-paste the following text and replace “[tool-domain]” by the tool’s domain url:
Step 4 (if you have 1 tool that require SPF):
Add an SPF record for 1 tools. It should look like this:

Copy-paste the following text:
Step 5: Check that your new setup works
Go to the “Deliverability checker” tool in lemstack to test your domain.
DKIM setup
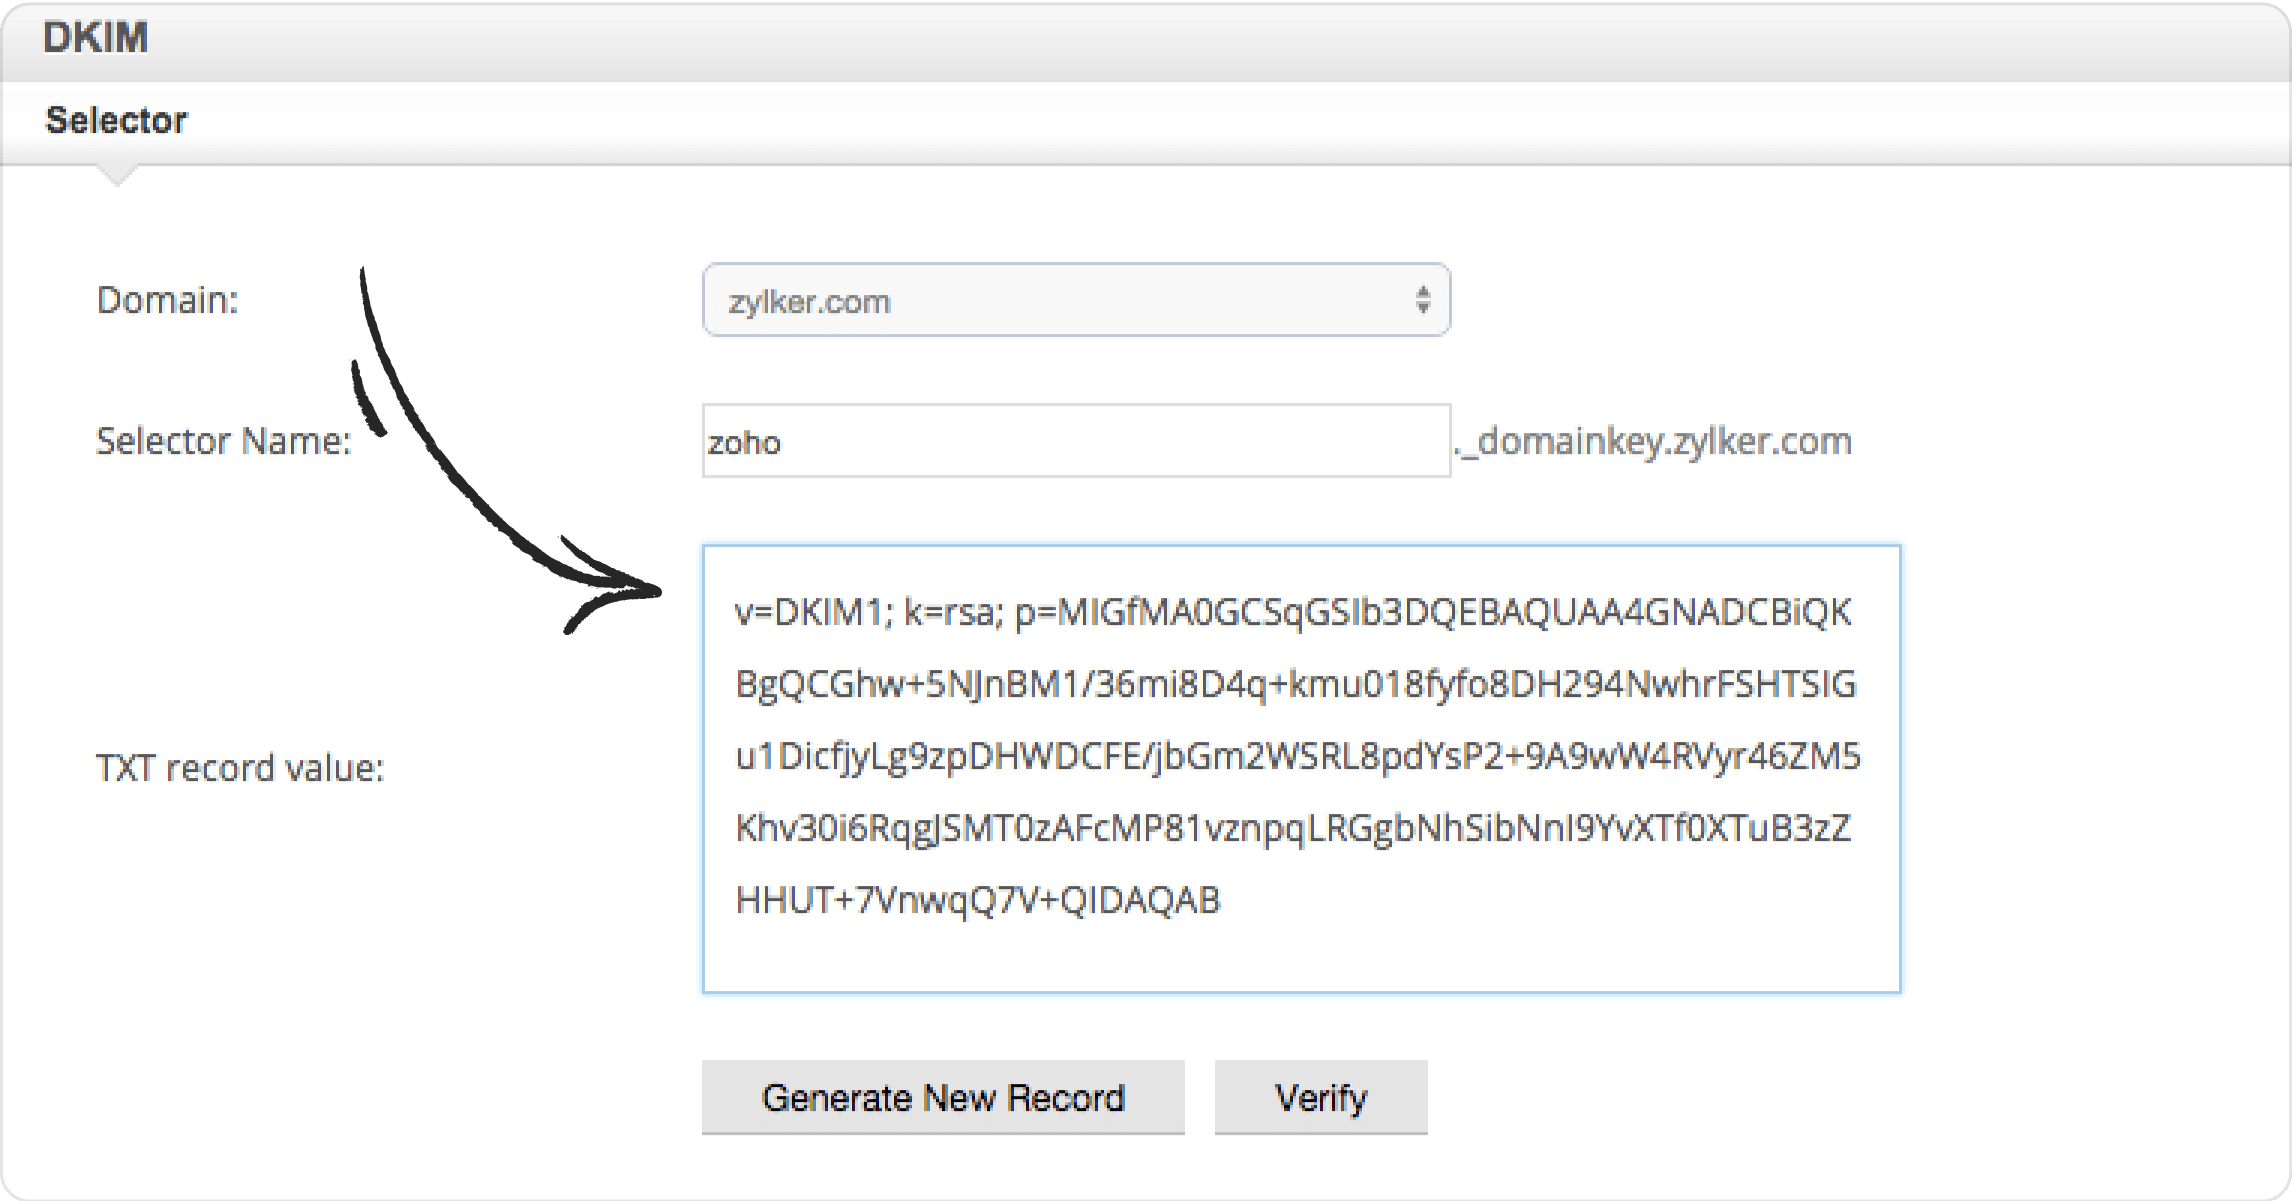
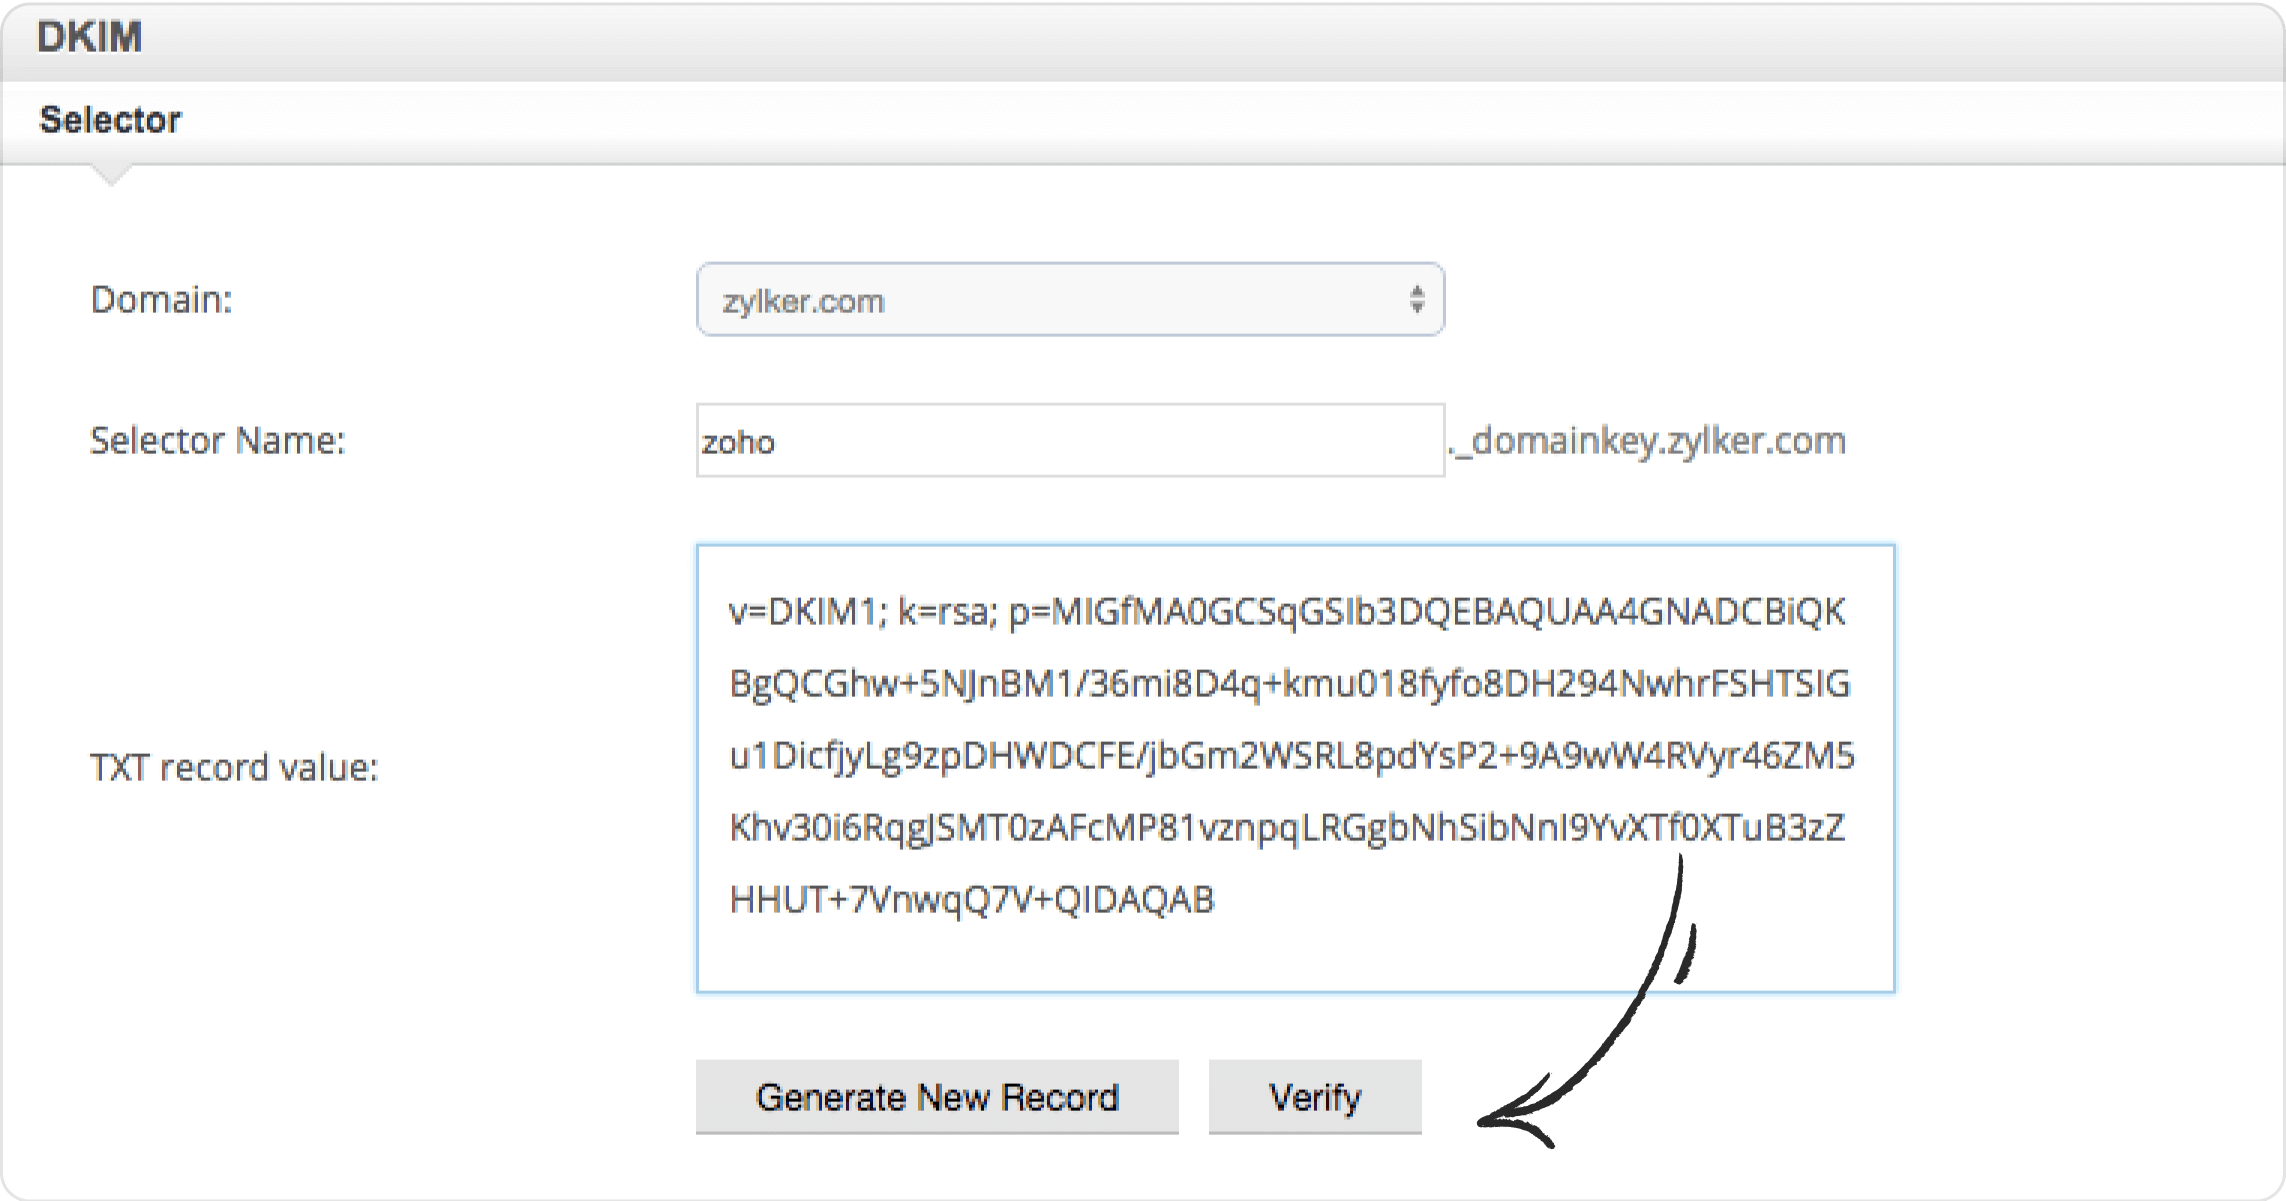
Step 1: Sign in to the Zoho Admin panel
Step 2: Navigate to "Email Authentication", then "DKIM"
Step 3: Select the domain for which you wish to enable DKIM.
Step 4: Sign in to your domain provider
Step 5: Navigate to the page to edit your domain’s DNS records
It can sometimes be called “DNS Management”, “Name Server Management”, or “Advanced Settings”.
Step 6: Add your DKIM to your DNS records
It should look like this:

Copy-paste the following text:
Step 7: On Zoho, click on “Verify“
Step 8: Check that your new setup works
Go to the “Deliverability checker” tool in lemstack to test your domain.
MX records setup
Step 1: Sign in to your domain provider
Step 2: Navigate to the page to edit your domain’s DNS records
It can sometimes be called “DNS Management”, “Name Server Management”, or “Advanced Settings”.
Step 3: Delete any existing MX records
They will look something like this:
Step 4: Add the following MX records
Copy-paste the following text:
Step 5: Check that your new setup works
Go to the “Deliverability checker” tool in lemstack to test your domain.
DMARC setup
Step 1: Sign in to your domain provider
Step 2: Navigate to the page to edit your domain’s DNS records
It can sometimes be called “DNS Management”, “Name Server Management”, or “Advanced Settings”.
Step 3: Add your DMARC to your DNS records
They will look something like this:
Step 5: Check that your new setup works
Go to the “Deliverability checker” tool in lemstack to test your domain.
SPF setup
Step 1: Sign in to your domain provider
Step 2: Navigate to the page to edit your domain’s DNS records
It can sometimes be called “DNS Management”, “Name Server Management”, or “Advanced Settings”.
Step 3: Check your current setup
Check that you don’t already have an SPF setup. An SPF record looks like this:
Step 4 (if you have 2 or more tools that require SPF):
Add an SPF record for 2 tools. It should look like this:
Copy-paste the following text and replace “[tool-domain]” by the tool’s domain url:
Step 4 (if you have 1 tool that require SPF):
Add an SPF record for 1 tools. It should look like this:

Copy-paste the following text:
Step 5: Check that your new setup works
Go to the “Deliverability checker” tool in lemstack to test your domain.
DKIM setup
Step 1: Sign in to your email service provider's administration console.
Step 2: Locate the settings related to your domain.
Step 3: Find the DKIM settings within your domain's settings.
Step 4: Initiate the process to generate a new DKIM record.
Step 5: Specify a selector for the DKIM record if prompted.
Step 6: Obtain the DKIM record, which typically includes a TXT record name and value.
Step 7: Sign in to your domain provider
Step 8: Create a new TXT record using the DKIM details from your email provider.
It should look like this:

Copy-paste the following text:
Step 9: Check that your new setup works
Go to the “Deliverability checker” tool in lemstack to test your domain.
MX records setup
Step 1: Sign in to your domain provider
Step 2: Navigate to the page to edit your domain’s DNS records
It can sometimes be called “DNS Management”, “Name Server Management”, or “Advanced Settings”.
Step 3: Delete any existing MX records
They will look something like this:
Step 4: Add the MX records given by your email provider
For instance, if Google is your email provider, it looks like this:
Step 5: Check that your new setup works
Go to the “Deliverability checker” tool in lemstack to test your domain.
DMARC setup
Step 1: Sign in to your domain provider
Step 2: Navigate to the page to edit your domain’s DNS records
It can sometimes be called “DNS Management”, “Name Server Management”, or “Advanced Settings”.
Step 3: Add your DMARC to your DNS records
They will look something like this:
Step 5: Check that your new setup works
Go to the “Deliverability checker” tool in lemstack to test your domain.
